Hello Odooers and Developers!
Welcome back to another Odoo tutorial from Devintelle!
This guide will show you how to add a new button beside the "Create" button in Odoo 18. You'll learn how to place the button in the Tree View (top-left) and the Form View (top-right). These buttons can be used to do special tasks, like exporting many records at once, opening pop-up wizards, or sending users to another page. Adding custom buttons helps you improve how users interact with your Odoo app. It's useful for saving time and making things easier.
Whether you're a developer or just starting, this guide will help you step-by-step in a simple way.
Use Case
Let’s say we have a model called dev.helpdesk.ticket, and we want to add a button labeled "Export to Excel":
- In the Tree View: The button should appear next to the Create button.
- In the Form View: The button should be visible in the form header.
- On click: It will execute a dummy Python method (which you can later extend).
Step 1: Define the Python Method
Here’s a simple Python method for now. This will be connected to the buttons in the XML views.
.py
from odoo import models, api, _
from odoo.exceptions import UserError
class HelpdeskTicket(models.Model):
_inherit = 'dev.helpdesk.ticket'
def test_odoo(self):
raise UserError(_("Button Clicked!"))
This method simply shows an alert when the button is clicked. You can replace it with your logic (e.g., export, redirect, open wizard).
Step 2: Add Button in List View (Near Create Button)
To place a button next to the "Create" button in the Tree View, inherit the tree view and add a <header> tag inside <tree>.
XML
<record id="tree_inherit_ticket_list_view" model="ir.ui.view">
<field name="name">tree.inherit.ticket.list.view</field>
<field name="model">dev.helpdesk.ticket</field>
<field name="inherit_id" ref="dev_helpdesk.tree_tickets_view"/> <!-- Replace with your actual view ID -->
<field name="arch" type="xml">
<xpath expr="//list" position="inside">
<header>
<button name="test_odoo"
string="Export to Excel"
type="object"
class="btn-primary"
display="always"/>
</header>
</xpath>
</field>
</record>
This button will now appear right beside the "Create" button in the Tree View.

When clicked, it shows a UserError popup saying " Button Clicked!".

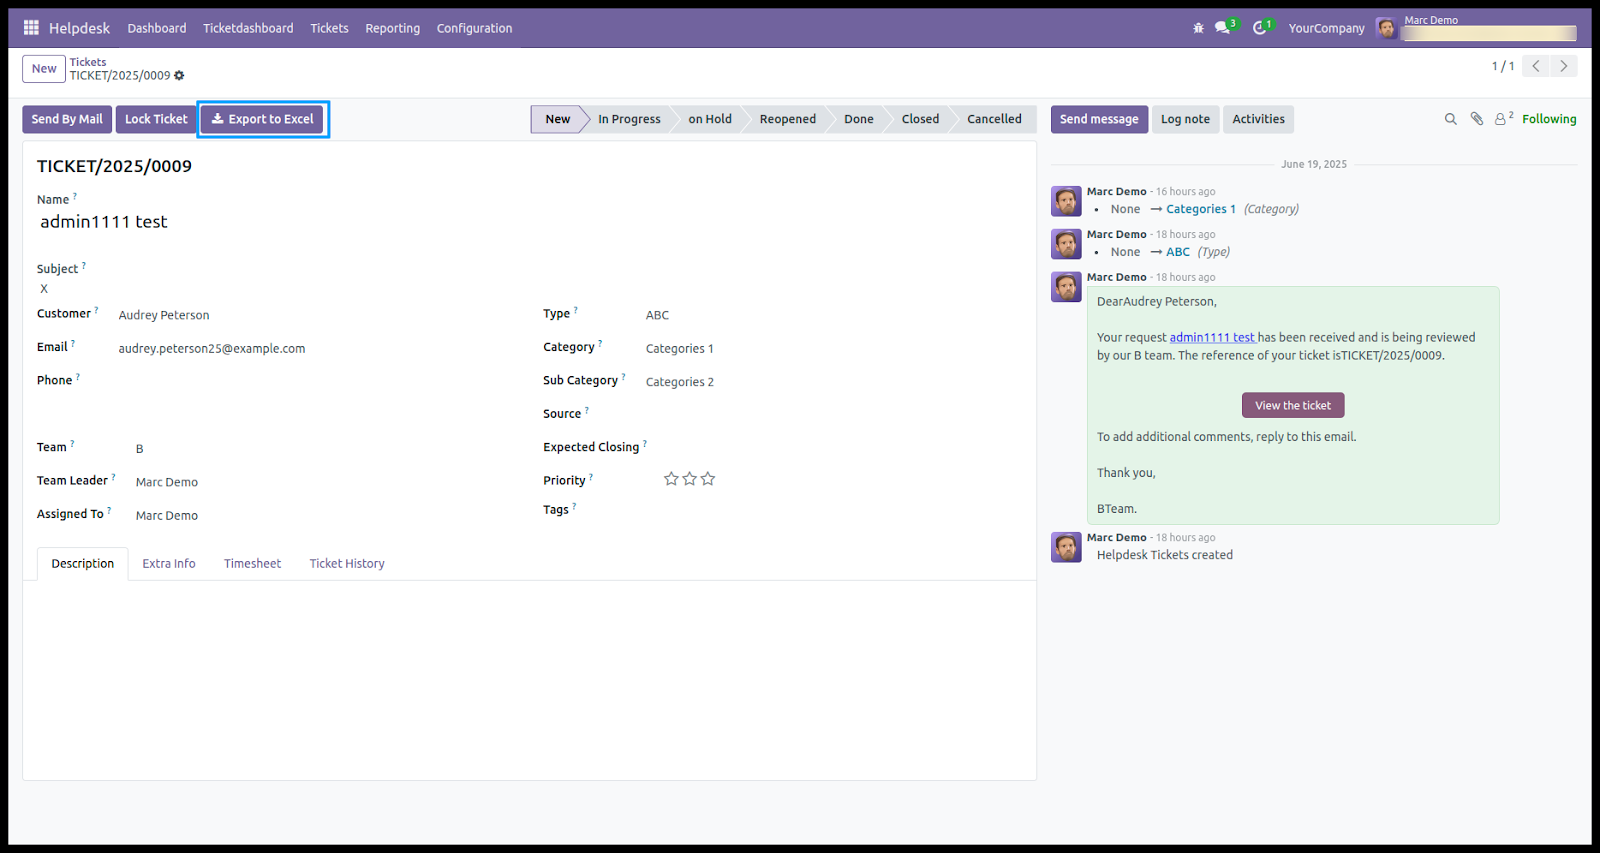
Step 3: Add Button in Form View Header
To display the button in the top-right of the Form View, inherit the form view and add the button inside the <header> tag.
XML
<record id="form_inherit_ticket_form_view" model="ir.ui.view">
<field name="name">form.inherit.ticket.form.view</field>
<field name="model">dev.helpdesk.ticket</field>
<field name="inherit_id" ref="dev_helpdesk.form_tickets_view"/> <!-- Replace with your actual view ID -->
<field name="arch" type="xml">
<xpath expr="//form/header" position="inside">
<button name="test_odoo"
string="Export to Excel"
type="object"
class="btn-secondary"
icon="fa-download"/>
</xpath>
</field>
</record>
This places the button alongside the default action buttons like Edit, Create, etc., in the form view.
Final Output
- Tree View: Button appears near the Create button.
- Form View: Button appears in the form header.
- Clicking the Button: Triggers a method that currently raises an alert ready to be extended.
Conclusion:
Odoo makes it simple to add custom buttons to improve how users work. In this guide, we:
- Added a button next to the Create button in the Tree View
- Added a button in the top-right of the Form View
- Connected both buttons to a Python method
Now, with just one click, you can export data, open wizards, or run reports easily. This small change saves time and makes Odoo more powerful.
If you need help building smart Odoo solutions like this, Devintellecs is here to support you with expert development and customization services.